Showing posts with label tomato. Show all posts

11 March, 2013

Quick Fish Provencal

I bought frozen cod that I was not impressed with. 
Originally I simply broiled it, a little salt and pepper and lemon.
Yuck. 

Since I'm pretty new to the fish game, 
I thought maybe I just don't like cod. 
But then I made this. 
Fish Provencal.

Browned fish fillets stewed in tomato sauce and fresh herbs.
Yum.

So fast, so easy, and pretty darn good!
This is a rustic version- I like to keep the onions and tomato chunks pretty visible.  For a more elegant version for entertaining, I'd suggest finely chopping the onion and pureeing the tomato before cooking.  

This is also a pretty basic version. It can literally be whipped up in a half hour. Add black pitted olives if you desire for a little authenticity (The Boyfriend hates olives, so I skipped it). 

Serve with crusty French bread, of course! (Unless you're gluten free!)
Quick Fish Provencal

4 6oz Cod fillets (or other white flaky fish)
2 large tomatoes, chopped
2 tbsp fresh chopped parsley
1 thyme sprig, leaves only
1 tbsp fresh basil leaves (about 6 basil leaves, chopped)
1 clove garlic, minced
Extra Virgin Olive Oil
Salt and Pepper
Flour (for dredging the fish- substitute almond flour if making gluten free)

In a large skillet, heat a few drizzles of olive oil over medium heat. When hot, add the onion.  Saute about 5 minutes, until onion begins to look translucent.  Add the garlic. Cook one minute.  Add the tomatoes and all the herbs. Season with salt and pepper, stir, and let sauce simmer while you prepare the fish. 

Add 2 tbsp oil to a skillet and heat over medium to medium-high heat. Season flour with a bit of salt and pepper.  Lightly dredge the fish fillets in the flour until both sides are coated. Add to the hot skillet, and saute until fish is browned on both sides.  Remove fish, and add to the simmering tomato sauce. Continue to cook for about 15 minutes, or until fish is flaky and cooked through.  

Garnish with a bit of freshly grated Parmesan if desired. 

A few other favorite recipes:
Sage Chicken Chili with Lentils and Garden Vegetables

Butternut Squash Gnocchi in Saffron Cream Sauce, Crispy Pancetta & Crumbled Pecans

04 March, 2013

Herbed Shrimp Risotto with Balsamic Tomato

Is there anything better in this world?
This dinner received another 'restaurant quality' rating from The Boyfriend. 
We both had seconds, and had no leftovers. 

These pictures are a bit fuzzy from the steam, but it was so good we had to eat it immediately.  
So I apologize for picture quality!

This is a warm, comforting risotto with a deep seafood flavor, chunks of shrimp, topped with a bit of dill and chive tomato salad.

Risotto gets all it's flavor from the stock you use.  I highly recommend making your own seafood stock for this dish.  It may sound hard and labor intensive (for those of you that have never made seafood stock) but it's really quite easy.  You just throw a bunch of stuff in a pot and let it simmer for about 45 minutes. That's pretty much it.

If you don't have the time or energy to make your own stock and are purchasing store-bought chicken stock, do yourself two favors:  
  1. Buy low sodium (store bought stocks are SO SALTY!)  
  2. Simmer the stock in a saucepot with some fresh herbs (thyme rosemary, sage, etc) and some chopped onion, carrot and celery.  It'll make store-bought taste more like homemade. 
Herbed Shrimp Risotto 
with Balsamic Tomato

Shrimp:
1/2 lb uncooked shrimp, deveined, shells and tails removed and reserved for seafood stock
1 tbsp extra virgin olive oil
1 tsp fresh thyme
1/2 tsp fresh finely chopped rosemary
1/2 tsp cayenne pepper
1/4 tsp smoked paprika
1/4 tsp fresh cracked black pepper

Risotto:
1 cup arborio rice
2 shallots, minced
1 tsp finely chopped dill
1 tsp finely chopped chives
1 tsp salt
Zest of one lemon
Extra virgin olive oil
About 1 quart shrimp stock, fish stock, or chicken stock

Balsamic Tomatoes:
4 plum tomatoes, diced
1/2 tbsp extra virgin olive oil
1 tbsp balsamic vinegar
1 tsp basil chiffonade
1/2 tsp chopped chives
fresh pepper to taste

1/4 cup freshly grated Parmesan cheese (optional, for garnish)

For Balsamic Tomatoes:
Combine olive oil and balsamic vinegar, whisk. Toss together the tomatoes, basil, chives, and pepper. Dress with olive oil mixture. Refrigerate until ready.

For Shrimp:
In a bowl, add the shrimp and all the remaining ingredients for shrimp. Toss well to coat the shrimp in the olive oil/herb mixture. Refrigerate for 30 minutes. 

Heat a skillet over medium high heat with a few drizzles of olive oil. Add the shrimp.  Cook a few minutes until shrimp start to look golden.  Flip, and continue cooking about 2 more minutes until golden on both sides.  Remove from heat and set aside.  Once cool, roughly chop the shrimp into chunks, leaving 6 shrimps whole to place on top of risotto. 

For Risotto:
In a large skillet, heat about 2 tbsp of oil over medium heat.  Add the shallot, and saute a few minutes until starting to soften. Add the arborio rice and cook, stirring constantly, until the rice is fully coated with olive oil (1-2 minutes). Add 1/2 cup fish stock and cook, stirring often,  until the liquid is almost completely absorbed (4-5 minutes). Add another 1/4 cup shrimp stock and simmer, stirring occasionally, until liquid is absorbed (~8-10 minutes).  This step is important- to cook arborio rice correctly, you must add the chicken stock in small increments.  Once absorbed, add another 1/4 cup, waiting for that to be absorbed, and continue adding 1/4 cups of stock until rice is creamy looking but still al dente, about 30-40 minutes. You may have leftover stock.  If you run out of stock, use water. 

Add the dill, chives, salt, lemon zest, and chopped shrimp to the risotto. Stir, and cook just a few minutes longer, adding a bit more stock if risotto is looking dry. 

To assemble:
Mound risotto of plate.  Top with a spoonful of balsamic tomato salad and whole shrimp.  Sprinkle with Parmesan if desired. 

18 February, 2013

Persian Turkey Kofte Kebabs with Shirazi Salad


I love Middle Eastern flavors.  The spices, the flavor, the simplicity of the preparation.  This is one of my favorite meals, and it also happens to be a healthy, gluten free, paleo, low fat recipe. 

Popular in Iran, Turkey, Armenia, and other Middle Eastern countries, kofte kebabs are typically made with ground lamb meat and herbs like parsley and mint. These ground meat 'meatballs' are skewered and grilled.  There are endless amounts of variations in meats and herbs, and lentil and potato kofte can be made with no meat at all.
These kebabs are traditionally heavily seasoned with spices like coriander, cinnamon, turmeric, and allspice.  I used ground turkey to make them healthier, and spiced them up to disguise that they are not lamb or beef.  

I served these with my favorite Persian Shirazi Salad, which sounds fancy but is really a simple salad of tomatoes, cucumber, red onion, and mint. The cold shirazi salad is a perfect cooling complement to the spiced kebabs. 
Add plain rice and some grilled (or in my case broiled) green peppers, and you've got an exotic, healthy meal. 


Persian Turkey Kofte Kebabs with Shirazi Salad

1 lb ground turkey
4 cloves garlic, peeled, mashed with the flat side of knife, and minced
1 tsp kosher salt
3 tbsp grated onion
3 tbsp chopped fresh parsley
1 1/2 tsp Worcestershire 
1 1/2 tbsp ground coriander
3/4 tsp ground cinnamon
3/4 tsp turmeric
1/2 tsp allspice
1/2 tsp cayenne pepper
fresh ground black pepper
Olive Oil
skewers - if using wood skewers, soak first. 
1 Green Pepper, seeds removed and cut into 6 large pieces

Shirazi Salad recipe follows.

Place everything except olive oil and green pepper (and skewers obviously) in a bowl and mix together. Let meat marinate in the fridge for an hour or all day if you have time. 

Form into 6 inch 'sausages.' If using metal skewers, coat in the skewers in olive oil so meat doesn't stick. Thread two sausages to a skewer through the two sausage ends.  You may need to adjust the sizes of your sausages according to the size of your skewers,  Keep them all the same size though. Throw the green pepper on the same pan if there's room, or a separate pan will do.

Broil on Hi for about 15-20 minutes, turning skewers and green peppers occasionally.  They are done when juices run clear, there is no pink, and outsides are evenly charred.

Shirazi Salad:
2 English Cucumbers
4 round tomatoes
1 medium red onion
1 tbsp dry mint or parsley (try to use mint if you have it)
1/2 cup fresh lime juice
1 tsp olive oil

Dice tomatoes, cucumbers, and red onions in a uniform small cube size.

Mix olive oil, lime juice, and dried mint (or parsley) in a bowl.
Pour over the vegetables.  Can be consumed immediately, but best if refrigerated for at least 2 hours and up to 2 days.

Serve with plain rice.  You can cook the plain rice in chicken or vegetable stock instead of water for extra flavor.  

30 November, 2012

Tomato Braised Kale


I love kale.

But some people don't.  

I had a feeling the Boyfriend was one of those haters, since he doesn't really like spinach if I don't somehow disguise it.  Spinach quiche? He's into it.  Spinach lasagna? Sure.  Spinach by itself on a plate?  No good.  

So I disguised this kale with some deliciousness.  I've had tomato braised kale in a restaurant before,  loved it, and tried to duplicate it here.  I really wanted a tomato flavor, the kale cooking in the tomato juices, so I used larger tomatoes (versus using grape tomatoes).  I had Campari tomatoes on hand, and I used all 2 lbs of them, as well as homemade chicken stock, of course.  

It turned out fabulous, with just a little kick from the red pepper flakes, and the tomato cooked down nicely and disguised the bitterness of the greens a bit.  

This is hands down, my new favorite kale recipe.  

Tomato Braised Kale

2 lbs kale, ribs removed and coarsely chopped
2 lbs Campari tomatoes (or 2 pints grape tomatoes), large diced
3 garlic cloves
1/2 cup to 3/4 cup chicken or vegetable stock
5 or 6 shakes red pepper flakes
Extra virgin olive oil
salt and pepper to taste

In a large stockpot, heat a few drizzles of olive oil over medium heat. Add the garlic, and saute about a minute.  Add the kale, in two batches if needed, letting it cook down and wilt a minute.  Add the tomatoes, stir to combine.  Add 1/2 cup chicken stock, red pepper flakes, and a generous amount of salt and pepper to taste.  Continue cooking, stirring occasionally.  If the kale looks dry, or is sticking to the bottom of the pan, add the rest of the chicken stock. Continue cooking about 10 to 15 minutes, until kale is wilted and tender.  Add more salt and pepper to taste.  

A couple other favorite recipes:
Sage Rubbed Pork Chops with Fennel Orange Puree
Gorgonzola Sage Popovers

09 September, 2012

Savory Sausage and Spinach Cannelloni


With fall approaching, I can't stop thinking about winter comfort foods. I may be jumping the gun, but I've already made Honey Spice Bread (which is similar to a gingerbread), and have been craving anything that has mounds of melted cheese (brought on by the best macaroni and cheese ever at Casellula in NYC).

So while looking to satisfy that hearty comfort food craving, but in a healthier way, I made this Sausage and Spinach Stuffed Cannelloni.  
This was so good, so warm and filling, and pretty healthy!
  The cannelloni filling is part spicy sausage and part turkey sausage that was sauteed and cooked down with onions and thyme.  The meat then was combined with sauteed garlicky spinach for a hearty, flavorful filling.  The cannelloni's were then placed on a bed of  a very quick raw tomato 'sauce', and topped with bechamel and parmesean cheese.
The cannelloni could easily be made ahead if you're planning on making it for guests or will be short on time.  You could also use jarred tomato sauce to save time.nThe whole thing can be assembled and refrigerated overnight, and then just popped it the oven when your ready!

The best part is the variations are endless! Have leftover chicken? Or even turkey?  Cut into cubes, add some broccoli, and you've got a variation of chicken and broccoli alfredo.  

             You could do sundried tomato, artichokes, and chicken.  Add a little ricotta if you desire..

You could do a caprese style cannelloni- fresh diced tomato, basil, and mozzarella.. maybe add some sauteed pancetta...  and top the whole think with more mozzarella.
I could go on..... but I think you get it ;)


16 May, 2012

Caprese Quiche

I recently spent the weekend with The Boyfriend's family, and his mom served up 2 beautiful quiches, and it got me to thinking- considering how much I love quiche, why do I never make it??

And then I remembered that The Boyfriend must eat as soon as he arises, or the world will feel his wrath.  I do not exaggerate. He knows it, I know it, and anyone else that knows him.. knows it.  Consequently, there is never time to prepare a quiche. Really, who has an hour and a half to prepare breakfast?


Well I took matters into my own hands last week.  I made pie crust, and froze half so I can whip up another quiche at any given moment.  The remaining crust I used for Caprese Quiche, and had it for lunch, and breakfast for the next two days (The Boyfriend had some for breakfast too- by the miracle of the microwave).

The caprese flavors- tomato, basil, and mozzarella- work beautifully in a quiche.  Because the flavors are more delicate, I made a lighter, fluffier quiche to not overpower the simple ingredients.  The taste though, is anything BUT simple.


Make sure you use the freshest ingredients for this quiche.  Do not commit the Ultimate Sin of buying a bag of pre-shredded mozzarella! Just don't do it!  Those bags say low moisture for a reason- they will make for a dryer, less elastic quiche (think about having a pizza- some pizza when you pick up a slice the mozzarella cheese stretches for miles before you can get it to tear- that's REAL, more elastic cheese... some pizza you can pick it right up, no long strings of cheese- that cheese is a little dryer, and what you will get with pre-shredded cheese).

So for best results, buy fresh mozzarella near the deli, NOT mozzarella from the refrigerated section. You'll thank me later.

Caprese Quiche

For the Quiche:
3 eggs (room temp)
2 egg whites (separated while cold, egg whites at room temp)
1 tomato, sliced into 6 slices, placed on a paper towel to absorb excess moisture
1 cup fresh basil leaves, chopped
3 basil leaves (for garnish)
1/2 cup fresh mozzarella, grated
1/2 cup mozzarella, cut into thin, round slices. Reserve 3 of the most perfect round slices.
1 cup milk
salt and white pepper to taste (I added about 1/4 tsp salt and a 1/4 tsp white pepper)
1/4 cup flour
extra virgin olive oil

A 9 inch pie crust (Purchase one, or for best results, make the crust below)

  1. Preheat oven to 350 degrees.
  2. Sprinkle tomato slices with a little flour on each side. 
  3. In a saute pan, drizzle a little extra virgin olive oil in pan over med-high heat.
  4. Add the floured tomato slices, and cook until just turning golden, about 2 minutes each side.
  5. Transfer to dry paper towels to drain (same way you drain bacon on paper towels. 
  6. Use a whisk (or fork) to beat the 3 whole eggs together.  Add the milk, chopped basil leaves, salt and white pepper.  Add the egg whites and SHREDDED mozzarella cheese.  Whisk to combine.
  7. Add 3 tomatoes to the pie crust so they are not overlapping. Add the SLICED  mozzarella on top of the tomato (making sure you reserve 3 of your prettiest slices)
  8. Slowly pour the egg mixture over the tomato and mozzarella.  
  9. Place the remaining 3 tomatoes gently on top of the egg mixture. Top each tomato with a basil leaf, and top the basil leaf with the 3 reserved slices of mozzarella.
  10. Bake in preheated oven 45-55 minutes, or until cheese is melted and quiche is golden on top.

For the Crust:
Recipe from The Joy of Pastry by David Munn

Makes two 9-inch pie crusts

2 cups all purpose flour
1 1/2 tbsp granulated sugar
1/2 tsp salt
10 tbsp cold butter
1 large egg
2 tbsp ice water
  1. If you have a food processor, add the flour, sugar, and salt to the processor.  Cut the butter into small cubes, and add them to the processor gradually, pulsing to combine.  Continue pulsing until butter is distributed and you have a very crumbly dough.
  2. If you do not have a food processor, mix together the flour, sugar, and salt in a large bowl. Cut the butter into small cubes, and cut it into the dough.  When cutting into the dough, I use a sharp knife, and literally keep cutting the dough on the sides of the bowl.  The butter gets broken up into smaller pieces, making a crumbly dough. 
  3. Remove dough from food processor if using, and add to a large bowl. Now the dough is in a large bowl for everybody.  
  4. Using your hands, grab handfuls of dough and squeeze together slightly (don't squeeze super hard!).  You must do this fast, because you don't want the warmth from your hands to melt the butter. Continue squeezing until butter chunks are about the size of raisins.
  5. In a separate bowl, mix together the water and egg, and add to the flour mixture.  Knead it through the flour mixture until the liquid is dispersed, but do NOT over-knead it. It will still be a very crumbly dough.  You'll be tempted to add more water.. don't.  A crumbly dough means a flaky pie crust.
  6. Form the dough into a ball.  You;ll have to squeeze it a bit to get the crumbs to form a ball.
  7. Wrap in plastic wrap and refrigerate 30 minutes.
When rolling out the dough:
  1. Remove dough from fridge. On a lightly floured surface, begin to gently roll out the dough.  Make sure you also flour your rolling pin, and dust some flour on top of the dough as well.
  2. If dough begins to crack, use your hands to lightly press it back together.  
  3. Keep checking to make sure the dough is not sticking to the surface.  If it is, peel it up with a spatula, and add more flour to the countertop. 
  4. Roll the dough out to about a 9 inch round circle.  
  5. Carefully lift it with a large spatula and place it in the 9 inch glass pie pan.
  6. Press down the sides so the crust is even with the baking dish. Place the whole dish in the fridge to let the dough relax for about 20 minutes. Preheat oven to 350 degrees.
  7. Remove crust from fridge and bake for 12 minutes.  Prebaking the crust without the quiche filling will keep the crust from getting soggy.
  8. Let cool for about a half hour before filling it with the quiche ingredients.

28 March, 2012

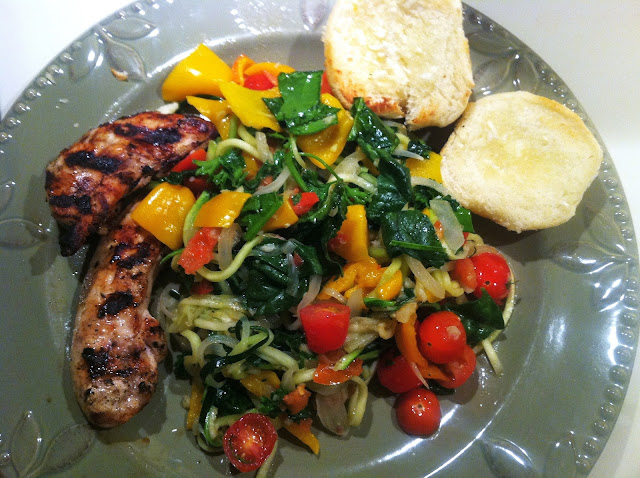
Zucchini Spaghetti with Spring Vegetables


Gluten Free
    This dish... is awesome.  So fresh, so simple, so healthy.  You will need to buy a julienne peeler if you don't already have one (under $10, can find at Target, Bed Bath and Beyond, etc with vegetable peelers). 

    I used fresh produce I had lying around in the fridge.  You can easily add or substitute whatever you may have lying around.  My vegetable measurements here are approximate- add as little or as much as you prefer!  I served this with grilled chicken and leftover slider buns that I made into mini garlic breads (obviously if you are gluten free you will skip that part)!

Zucchini Spaghetti with Spring Vegetables
Serves 3-4

 You will need:

2 zucchini
10 mini sweet peppers, seeds removed and cut in fours
1/2 red pepper, cut into large dice
2 roma tomatoes, diced
About 12 grape tomatos, cut in half
2 large handfuls of fresh spinach, chopped
1/2 white onion, thinly sliced
4 anchovy fillets (used as a seasoning, you won't even know it's in there!)
Extra Virgin Olive Oil
7 garlic cloves, minced
salt and pepper


Use the julienne peeler to make the spaghetti.

Place the zucchini spaghetti in a colander.  When you are finished making the spaghetti, put the colander in the sink and toss a couple pinches of salt on the zucchini.  Leave it sit while you prepare the rest of the meal.  (This step draws out some of the liquid so you don't have mushy spaghetti).  


Next heat water to steam the sweet and red peppers until still a bit crisp.  If you don't have a steamer, you can simply boil them for about 5 minutes.  The key here is to soften them a little bit, but to leave them with a little snap.

While the peppers are steaming/boiling, heat about 4 tbsp of olive oil in a large skillet over med-med high heat (heads up-this needs to be large, the zucchini and ALL veggies will wind up in here). Add the garlic, onion, and anchovies to the pan and saute, breaking up the anchovies until they melt away with your spoon (this should only take about 2 minutes... watch the heat of the stove- you don't want to burn the garlic!)

Once the anchovies have been incorporated with the garlic and oil, add the zucchini, gently tossing to combine.  Season with a little salt and pepper. Add the peppers and roma tomatoes, stir to incorporate.  Cook the zucchini  spaghetti about 3 more minutes.  Finally add the spinach and grape tomatoes.  Stir to combine well, and serve!

Slider Bun Garlic Bread

To make garlic bread out of slider buns, I simply minced a clove garlic and rubbed 1/2  on both sides of 2 slider buns ( a total of 4 pieces).  Then I melted 2 tbsp of butter in microwave until soft but NOT RUNNY.  I added the other 1/2 of the garlic clove, a pinch of salt, stirred until it was a thick buttery garlic paste, and buttered the buns.  Put into toaster oven until slightly golden, and voila!

Gluten Free