Showing posts with label party. Show all posts

10 January, 2013

Mexican Flavored Chili

Holy smokes do I have a chili recipe for you!

Back from a day of skiing, me and The Boyfriend were craving some warm comfort food.  I thought I'd make something quick and easy.  

I mean, you just throw everything in a pot when making chili. How much simpler can it get? 

But no.  
Here I go, roasting peppers first, making purees, all sorts of ridiculousness that took me an hour and a half before everything got simply tossed in a pot.  

But I was thinking of you, invisible internet people.  I wanted to share with you a different way of making chili, not using canned tomatoes and tomato paste.  So I made my own puree of roasted red peppers, poblano peppers, and tomatoes. 

You may be scared by all the peppers if you don't like spicy.  I will say this chili has some kick for sure, but it's not one of those try-to-rip-your-tongue-out-of-your-mouth spicy.  Eliminate the sriacha/hot sauce and cayenne if your nervous.  Those who want more spicy can always add hot sauce. 
In the end, this was a most delicious chili, and worth the time and effort.  I made a huge batch (what's the point of making chili if it only feeds you for 2 days?!).  I'd say this recipe would feed about 14 people.  We had leftovers for 3 days, and I have 2 tupperwares in the freezer for some quick winter meals.

Of course this is a perfect party sized chili for all you football fans out there. You could even make it a day or two ahead and have it in a crockpot for when you've had too many beers to actually cook anything at your football party. :)

Mexican Flavored Chili

The meat:
16 oz ground chorizo
16 oz mild italian sausage
3 lb ground beef


The veggies

7 stalks celery, chopped in 1/4 inch slices
1 jalapeno, stem and seeds removed, minced 
2 green peppers, stem and seeds removed, cut into 1/2 inch dice
1 red pepper, stem and seeds removed, cut into 1/2 inch dice
4 carrots, peeled, cut in half lengthwise, then cut in thirds lengthwise and diced
2 onions, coarsely diced

The stuff you throw in chili:
26 oz can red kidney beans, drained
30 oz can pinto beans, drained
15 oz can cannellini beans, drained
1 tbsp paprika
1/2 tsp cumin
1 tsp cayenne
1 tbsp marjoram
1 tbsp oregano
1 tbsp Sriacha or hot sauce of choice

1 bottle dark beer


Base Puree
2 poblano peppers(sometimes called pasilla peppers)
3 red peppers 
5 tomatoes
3 cloves minced garlic

1. Make the base puree.  Broil or grill the poblano, red peppers, and tomatoes until the skin turns black in spots (or for tomato, until the skin begins to crack and peel back on it's own).  Let cool until easy to handle, and remove stem, seeds, and peel skin.  Coarsely chop peppers and tomato and place them and the 3 cloves of garlic in blender or food processor and process until a paste.  Set aside.  

2. While peppers are roasting, brown meats. Add half of each meat to 2 large stockpots and cook, stirring occasionally, until meat is browned. Remove meat with a slotted spoon and set aside (you can set the meat aside from both stockpots in the same bowl).

3. In same two stockpots over medium high heat, add half the veggie mixture to each pot.  Saute until veggies begin to soften a bit, but are still pretty crisp. This step helps veggies release some of their sugars and will make them more flavorful.  

4. Add half the meat back to each pot, and half the 'stuff you throw in chili' to each pot.  Bring the pots to a boil, turn down the heat and simmer for about an hour and a half. 

5. When finished, marry the two pots.  Once cooked down, I could add one pot to the other and it fit perfectly.  Stir well and don't forget the sour cream!

06 January, 2013

Little Party Bites


Oh look at these cute little bites!  


I made these to ease the Boyfriend's growling stomach while I prepared some 3-4 hour dinner.  If I had any friends here in CO I would prepare them as an appetizer, they'd be perfect to have out for parties.  

The herbed cream cheese gives these bites a savory note, the prosciutto adds a nice flavor from the fat and salt, and the cherry jam gives it a touch of sweetness to round it out.  
And they were so easy to prepare, the most time going into assembling them in a pretty fashion.  

I'll be honest, most of them I just smushed together.  Hey it was just me and the Boyfriend, you know?! What do you want from me?  

Little Party Bites

1 8 oz block cream cheese, at room temperature
3 tbsp minced fresh rosemary
1 tbsp minced fresh mint
1 tsp lemon juice
4 oz thin-sliced prosciutto, cut lengthwise into 1/4 inch ribbons
Cherry preserves 
1 box wheat thins (or Gluten Free crackers)

Use a mixer to whip the cream cheese with the rosemary, mint, and lemon juice (or alternatively, mix well by hand)

To assemble, spread a bit of cherry preserves on the wheat thin.  Twirl the prosciutto ribbon loosely and place in a half circle on the cracker.  Place a dollop of herbed cream cheese in remaining empty space behind prosciutto.  Garnish with more rosemary, mint, or a spring of parsley. 

27 December, 2012

Spinach, Feta, and Fresh Mint Pastries

Filo dough it one of the greatest things, if you ask me.

So flaky, so shapeable to savory or sweet recipes.

I was looking for a most delicious appetizer to serve for a holiday meal, and this was a winner.  
This is pretty much a recipe for Spanakopita, a classic Greek pastry.  I do love Greek food, and these little flaky triangles can be made 3 (yes 3!) days in advance.  (Cover, refrigerate, and bake as directed when ready)
If you've never worked with filo dough before, I must say it requires a bit of patience, understanding, and finesse.  These thinner-than-paper sheets can get the best of you if you're in a rush, so set aside some time and read through the instructions carefully first.

I don't want to scare you off, I actually find filo dough very easy to work with, but some unfamiliar with it and pressed for time... well.. they wind up of that TV show Snapped. 
The secret is lots of butter and keeping the filo dough moist.  When not using the pile of filo dough, you must place a damp rag on top to keep the moisture in.  If you don't the sheets crack and are flaky and IMPOSSIBLE to handle. 

Follow those steps and it'll be a breeze.  


Spinach, Feta, and Fresh Mint Pastries


Makes 30 triangles

1 1/2 lbs spinach, tough stems removed
1 1/2 cups crumbled feta cheese
1/2 cup freshly grated Parmesan or Pecorino cheese
4 eggs, lightly beaten
2 tbsp chopped fresh mint
1/2 tsp nutmeg
1/2 lb filo dough (20 sheets), thawed if frozen
1/2 cup unsalted butter, melted and cooled

In a large stockpot, heat a few drizzles of olive oil over medium heat.  Add the spinach, and saute until wilted.  Pour into a colander and let cool.  Squeeze out as much liquid as you can and place on cutting board.  Chop spinach and place in a large bowl.  Add all cheese, eggs, mint, nutmeg, and salt and pepper to taste.  Mix well. 

Preheat oven to 375.

Lightly butter a baking sheet.  Have the melted and cooled butter in a bowl or pot, and the spinach mixture in a bowl nearby. Cut the filo dough lengthwise into thirds, so you have 3 long strips.  Get a rag moist and cover the filo until ready to use.  Place a large piece of parchment paper on your countertop.  Using a pastry brush, coat the parchment paper with a layer of butter.  Remove one of the 3 stacks of filo dough from underneath the rag.  Place one piece of the paper thin filo dough on your buttered parchment paper.  Use the pastry brush to cover that piece with butter, paying special attention to the edges and corners. Place another sheet of filo directly on top, and coat with butter. In the top corner of the filo sheet, place a teaspoon of the spinach mixture.  Fold one corner over the the filling on the diagonal to form a triangle.  Fold down again, keeping the triangle shape.  Continue folding until you've reached the bottom and you have a triangle shaped pastry.  Place on baking sheet and repeat.  Don't worry if a sheet rips, the butter will reattach it.  

Bake until golden, about 15 minutes.  Can be served hot, warm, or at room temp.


26 December, 2012

Tuscan Prosciutto Wrapped Shrimp

These little shrimps have a big flavor.
Marinated in lemon, garlic, thyme, rosemary and sage, these are herb-a-licious.

The Boyfriend says the shrimps would be equally good without the prosciutto due to the super herb-y flavor from the marinade.

'I'd pay money for these,' he says. 
One shrimp I ate tasted like the pine-y rosemary, while the next had that sweet, almost citrusy thyme flavor.

Wrap them up in prosciutto and see how fast they get gobbled up.  

 Fast, easy, and prepared ahead, this is a great party appetizer, or an appetizer for an intimate dinner.  Shrimp are an aphrodisiac ;)
If it was warmer out, I would have slapped these on soaked bamboo skewers and threw them on the grill.

Tuscan Prosciutto Wrapped Shrimp
Serves 2

1/2 lb peeled and deveined shrimp
5 or 6 slices thin sliced prosciutto (about 5 ounces)
4 sprigs thyme, leaves removed and stem discarded
6 or 7 rosemary leaves (NOT whole sprigs!) minced
1 large sage leaf, minced
1 tsp lemon juice
3 tbsp extra virgin olive oil plus extra for cooking

In a Tupperware or ziploc bag, combine the shrimp, olive oil, and herbs.  Let marinate for 2 hours.  
Add the lemon juice, and let marinate another 20 minutes.

Slice the prosciutto in half width-wise, and then into about 3/4 inch slices.  Wrap each shrimp with a slice or prosciutto.  

When all shrimp are wrapped heat a few drizzles of olive oil in a large skillet over medium high heat.  Add the shrimp and let cook until shrimp is opaque and prosciutto is crispy, about 3 minutes per side. 

Serve immediately. 


01 December, 2012

Homemade Cranberry Sauce


Ohhh cranberry sauce, how I've dishonored you.  
I made you with love, then froze you, it's true!
And even worse, then I forgot about you!
But it's not too late to be made anew.  

Yes, Thanksgiving was a holiday you missed.
But take it easy, don't be pissed!  
You made these muffins so delish!
And also this braised beef you kissed.

Apparently I've lost my wits,
writing a poem to a condiment, 
but I do what I must and what I must do is cook,
thanks for stopping by and taking a look. 
At what I cook.  

:)

Homemade Cranberry Sauce
Adapted from Food Network

12 oz bag fresh or frozen cranberries
1 cup granulated sugar
1 strip orange peel 
2 tbsp orange juice

1. In a saucepan over low heat, add the half of the cranberries, the water, sugar, and orange peel.  Cook for about 10 minutes, stirring occasionally, until sugar dissolves and cranberries are soft. Increase heat to medium and cook until cranberries burst (about 12 minutes).

2. Reduce heat back to low and add the rest of the cranberries.  Cook for about 5 minutes, stirring occasionally, until new cranberries slightly soften.  Remove from heat and cool before serving. 


28 November, 2012

Butternut Squash Lasagna with Italian Sausage, Spinach, and Sage

 I asked The Boyfriend to describe this dish for me, and he said it was good.  I pressed him for more details, and he said 'I dunno.. it was cheesy?'

In his defense I'm asking him while he's half asleep on the couch.

I pressed him a bit further... he said it didn't feel like he 'rubbed it all over his face.' 

Yes, that's a direct quote.  
'It wasn't greasy and overly heavy, it was lighter and healthier than traditional lasagna. Therefore I did not feel like I rubbed it all over my face.' 

I get what he's saying.  It wasn't so loaded with cheese that I felt like I gained 110 lbs just by eating it.  The butternut squash and sage combination gave it a really delicate flavor, and sausage pairs beautifully with the squash, complementing it's sweetness.  
The white sauce made with mascarpone, parmigiana, mozzarella, and ricotta was not heavy or overbearing.  It really lets the flavors shine through. 

This recipe is a winner, and a really nice option for a make-ahead meal.  I made this for an upcoming ski weekend and froze it.  
Then I just took it out of the freezer, let it thaw all day while skiing, and popped it in the oven at night.  
Also a nice vegetarian option- simply skip the sausage and replace chicken stock with vegetable stock.  Don't skip the stock though, it thins out the cheese a bit so you don't feel like you 'rubbed it on your face.'

18 November, 2012

Wensleydale Apple Cranberry Tartlets with Thyme Shortbread Crust and Bourbon Glaze

Be the star of a holiday party- bring these delectable little tartlets.  
They're like little mini-apple pies, made with Wensleydale cheese with cranberries. 
Wensleydale is an English crumbly cheese that is supple and moist with a flavor of wild honey.

Wild Honey!

This Wensleydale has cranberries mixed in- adding just a bit of... tartness... to these tarts! 
An unexpected, but incredible herb-y thyme shortbread crust that balances out the sweetness of the apples. 

I found this Wensleydale with Cranberries at Whole Foods.  
It would be AMAZING on a leftover turkey sandwich after Thanksgiving.  
So as I'm baking these, The Boyfriend keeps asking me when he can have one.
Finally I give him one.  I turn around, turn back around, and it's gone.  GONE.  

He looks at me wide-eyed, like he doesn't know what happened. 
And takes another.   

Wensleydale Apple Cranberry Tartlets with Thyme Shortbread Crust and Bourbon Glaze

The Crust:
1 1/4 cup bread flour
3 tbsp sugar
1/8 tsp pure vanilla extract
1/4 cup thyme, leaves only, chopped
1/2 cup butter
2 tbsp ice water

The Tart:
4 Granny Smith Apples, peeled and sliced
2 McIntosh Apples, peeled and sliced
1/4 lb Wensleydale Cheese with Cranberries
3 cups sugar
1 cup plus 1 tbsp water
1 stick cinnamon
2 whole cloves
1 cup heavy cream
1 tbsp bourbon

*You'll also need some kind of little tart baking pans. I found mine at either Kitchen Kapers or ACMoore, I can't recall..

Make the Crust:
1. In a medium bowl, combine the flour, sugar, vanilla, and thyme. Cut in the old butter using a pastry blender or a knife until dough is crumbly.
2. Sprinkle 1 tbsp cold water over dough.  Quickly form into a ball, adding a few more drops of water if you need more moisture to hold it together. Do as quickly as possible, you don't want to handle the dough to long or the warmth from your hands will melt the butter, resulting in a less flaky crust.
3. Wrap dough in plastic wrap and chill for at least an hour, or a day or two.
4. Remove from fridge and roll out to about 1/4' thickness.
5. Cut out approximate shape of your tart pan, and lay dough over top.  Press into pan gently.  Use a rolling pin to roll over the TOP of the tart pan, giving you a nice even crust.
6. Cover with plastic wrap and refrigerate until needed.

Make the Tart:
1. Preheat oven to 350 degrees. In a medium saucepan, combine the sugar, water, cinnamon stick, and cloves. Bring contents to just a boil.
2. Reduce heat immediately and add all apples.  Cook until tender but not falling apart.  If it looks like the liquid is evaporating to quickly, add a bit of water to keep it moist.
3. Remove the apples, and lay out on parchment paper in one layer to cool off.  Reserve the poaching liquid.
4. Slice the Wensleydale cheese thinly.  Don't worry if it crumbles. 

Assemble:
1. Remove the crust from fridge.  Add a few of the apple slices that did not keep their perfect shape (the unsightly ones).  Top with a few slices (or crumbles) or cheese.  Pour 1 tsp of heavy cream over, letting it sink down (this is how much I used for tarts that were 3 inches across.  If you are making larger tarts, you may need to add a tbsp or two of heavy cream.  The cream shouldn't reach the top of the tart, rather just cover the bottom layers of apples and beginning to seep into the cheese layer).
2. Add the pretty, intact sliced apples on top, fanning them out decoratively.  At the base of the 'fan' add a crumble of cheese with cranberry for contrast in color.
3. Repeat with remaining tarts.
4. Bake in the preheated oven about 10 minutes, until edges of apples begin to darken and shortbread crust begins to turn golden.
5. Cool on a wire rack.

Glaze:
1. When tarts are cool, remove the cinnamon stick and cloves from the reserved poaching liquid. Add the bourbon.  Head the liquid medium high heat, reducing by half.  Liquid will get a bit sticky.
2. Brush the glaze over the tarts immediately. Let dry, and brush another layer over. 

13 November, 2012

Drunk Filet Mignon with Bourbon Cream Sauce


I am no photographer! 
I love to cook and I love to eat, but patience with taking photos of food is not my strong point. 

I want to eat it, not look at it!

So I must apologize for these clearly lazy, last second pictures of this truly amazing Filet Mignon.

This is one of those meals that just steals the spotlight away from EVERYTHING else on the plate.    One of those sauces that makes you want to lick the plate.  
It's deeply flavorful, just a bit sweet, and everything I've ever dreamed of to accompany a beautiful  cut of Filet Mignon.  

Unfortunately I did not have a beautiful cut of Filet Mignon, but the one I had did just fine, and the Bourbon Cream Sauce made everything wrong with it.. just seem so right. 

Pair this sauce with any red meat- Rack of Lamb, a standing Rib Roast- for a super-impressive main dish.  

I served it with Butternut Squash Quinoa Alfredo, caramelized brussel sprouts and a couple glasses of red wine. 

Dark Chocolate Coconut Cake

The perfect midafternoon snack- 
coffee and cake!

This Dark Chocolate Coconut cake is not overly sweet or decadent. 
It's sophisticated. 
Deep, dark, and chocolaty. 

The yogurt and coconut add another layer of sweet moistness.
And the glaze adds gives it a sheen chocolate crust.  
The perfect ending to a holiday brunch,
or perhaps a slice during teatime...
this cake will sooth the winter blues away.


You'll note instructions say to bake in a bundt pan.
You'll also notice in the pictures I did not bake mine in a bundt pan. 

A tragedy of moving- lost, forgotten kitchen supplies.
Like Toy Story, only it's my bundt pan and spatulas dancing around my room.

I encourage you to reconnect with your bundt pan though.  


Dark Chocolate Coconut Cake


CAKE:
 7 oz bag sweetened shredded coconut (about 2 cups)
1/2 cup sweetened condensed milk
1 large egg white
2 cups all purpose flour
1/2 cup unsweetened cocoa powder
2 tsp baking powder
scant 1/2 tsp baking soda
1 1/2 sticks (6 oz) unsalted butter, softened
1 cup plus 2 tbsp sugar
3 large eggs
3 oz bittersweet or semisweet chocolate, melted and cooled
2 1/4 tsp pure vanilla extract
1 1/2 cups plain nonfat yogurt

GLAZE:
1/2 cup sugar
1/4 cup water
1 tbsp unsweetened cocoa powder
1/2 tsp pure vanilla extract

1. Make the sweet coconut/yogurt filling. In a small bowl, combine the chopped coconut, egg white, and condensed milk.  Using your hands, form this mixture into an 18' long rope, and wrap in plastic wrap.  Refrigerate for at least 20 minutes, until slightly firm.

2. Make the cake. Preheat oven to 350 degrees, and butter and flour an 8-cup bundt pan.  In a small bowl, sift the flour, baking powder, baking soda, and salt. In a separate, large bowl, beat the butter until creamy. Add the sugar, beating until light and fluffy, and add the eggs one at a time.  Once combined, add in the melted chocolate and the vanilla.  Finally, add the flour mixture and the yogurt in batches- add a bit of flour, mix, add a bit of yogurt, mix, flour, mix, yogurt, mix, etc until all of the flour mixture and yogurt is gone and batter is smooth. 

3.  Pour the batter into the prepared bundt pan.  Remove the coconut rope from the fridge, unwrap, and place on top of the batter, following the circle of the pan.  Let the rope sink into the batter a bit (give it a few pokes to help it sink in) until the rope is beneath the surface and fully covered by about an inch of batter.  

4. Bake for one hour, or until toothpick comes out clean.  Cool on a wire rack in pan for 10 minutes, and invert to cool completely.

5. Make the Glaze. Bring the water and sugar to a boil in a medium saucepan, stirring frequently to dissolve the sugar.  Once dissolved, remove from heat and immediately whisk in cocoa powder and vanilla.  Let cool.  Do not attempt to pour the hot glaze on a hot cake.  That has disaster written all over it!

6. Once cake is cooled, and the glaze is cooled to lukewarm, brush the glaze over the cake.  Let this layer dry slightly (about 5-10 minutes).  Brush another layer on, let dry, brush, etc until glaze is gone.  Refrigerate the cake- the glaze will set and harden.  


09 November, 2012

Sweet Potato Croqettes

I love sweet potatoes. 

Sweet potato fries, casserole, mashed sweet potatoes, pie....
ahhhhhhhhhhh 

I took my love one step further and make these Sweet Potato Croquettes.  
This is a Southern recipe, though I've also seen 'Fried Yam Balls' in African cooking.
They are reminiscent of hush puppies, though hush puppies contain much more breading.
And if you don't know what a hush puppie is, you need to take a trip down south and find out. 

Anyways, these  are delicately crispy on the outside, soft sweet potatoes on the inside.
These would be perfect for an appetizer for a party, or served as a side to dinner for a little added fun-n-crunch.  I could see them being added to a brunch menu too.
I made these the day before- I roasted the sweet potatoes and added all the ingredients but bread crumbs and eggs.  The next day, I simply added the crumbs and eggs, and fried.  

I fried these in extra-virgin olive oil.  No they weren't slimy at all, as you may think would happen from frying in olive oil.  The fact is, olive oil's smoke point is 410 degrees.  When deep frying, oil is  somewhere between 250-350 degrees.  That means you most certainly CAN fry with olive oil- in fact it is healthier, and frys things a bit more delicately if you ask me.
You can use peanut oil or even vegetable oil if that's what you have on hand.

I'm pretty sure using leftover mashed sweet potatoes, adding the bread crumbs and egg, would work just great too!

25 September, 2012

21 September, 2012

Almost Shepherd's Pie

Okay. This technically is not a pie. 
This is something warm and delicious that falls under the comfort food category- it's what happens when a shepherd's pie meets a meat ratatouille.  

Shepherd's pie is basically a beef and vegetable pie topped with a layer of mashed potatoes. Ratatouille is a French dish that is a tomato-based saute of vegetables, eaten as a side dish or main course.
I used spicy Italian sausage in place of beef, used a bunch of ratatouille vegetables like green peppers, onions, and squash, and skipped adding any tomato.  Instead of a mashed potato topping, I used cubed potatoes sauteed in garlic and butter and topped with cayenne pepper.  

You can obviously use sweet ground Italian sausage if you like, but this wasn't overwhelmingly spicy at all.  It definitely had a little kick though.
The Boyfriend went back for seconds.  So did I.  In fact, we almost ate the entire thing.

17 September, 2012

Gorgonzola Sage Popovers


Hellloooo Beautiful.
These bad boys have a delicate, hollow interior and a crisp exterior.  

A savory popover with hints of sage, the perfect complement to a nice pork tenderloin, beef roast, chili or soup, or almost any other meal I can think of! 

Add this to your Thanksgiving or Christmas dinner for a really special dinner roll.

The use of a blender in making these popovers makes sure that air is incorporated in the batter, which enables the popovers to blister and give them the beautiful, hollow interior.  
Make sure you use clarified butter when called for, or the popovers will burn.

Sage Chicken Chili with Lentils and Garden Vegetables

Here's a nice fall meal for you!
My parents recently gave me an organic homegrown squash that was almost as big as me.. maybe a mild exaggeration.. but look:
They also gave me homegrown peppers and tomatoes, and with this beautiful fall weather and football season starting, OF COURSE I'M GOING TO MAKE CHILI!

This is a healthier chili- made with chicken, protein packing lentils, and lots of vegetables.  It's mildly spicy, though of course you can adjust it to your own tastes.  If you want less spicy, skip the jalapeno and reduce the chili powder to a teaspoon or none at all. For more spicy, increase chili powder to 2 tbsp, and if you really want it hot add another jalapeno!

This is a one-pot meal- no rice required!  The lentils are way healthier than rice, and make the chili a bit more hearty and filling.  Afraid of lentils?  Don't be- they really don't taste like much- they soak up the flavor of the chili, and The Boyfriend didn't even know they were in there.  He still doesn't.   :)  

This chili would make for a perfect vegetarian chili too- just skip the chicken, increase the lentils, and use vegetable stock in place of chicken stock.  The recipe is very forgiving- add and subtract vegetables as you desire.

As with any chili, this can be made in the crockpot or on the stovetop. I wrote down both methods for you. 

Serve with a dollop of sour cream if you like, maybe a Gorgonzola Sage Popover, and voila! Dinner is served. 

09 September, 2012

Savory Sausage and Spinach Cannelloni


With fall approaching, I can't stop thinking about winter comfort foods. I may be jumping the gun, but I've already made Honey Spice Bread (which is similar to a gingerbread), and have been craving anything that has mounds of melted cheese (brought on by the best macaroni and cheese ever at Casellula in NYC).

So while looking to satisfy that hearty comfort food craving, but in a healthier way, I made this Sausage and Spinach Stuffed Cannelloni.  
This was so good, so warm and filling, and pretty healthy!
  The cannelloni filling is part spicy sausage and part turkey sausage that was sauteed and cooked down with onions and thyme.  The meat then was combined with sauteed garlicky spinach for a hearty, flavorful filling.  The cannelloni's were then placed on a bed of  a very quick raw tomato 'sauce', and topped with bechamel and parmesean cheese.
The cannelloni could easily be made ahead if you're planning on making it for guests or will be short on time.  You could also use jarred tomato sauce to save time.nThe whole thing can be assembled and refrigerated overnight, and then just popped it the oven when your ready!

The best part is the variations are endless! Have leftover chicken? Or even turkey?  Cut into cubes, add some broccoli, and you've got a variation of chicken and broccoli alfredo.  

             You could do sundried tomato, artichokes, and chicken.  Add a little ricotta if you desire..

You could do a caprese style cannelloni- fresh diced tomato, basil, and mozzarella.. maybe add some sauteed pancetta...  and top the whole think with more mozzarella.
I could go on..... but I think you get it ;)


16 August, 2012

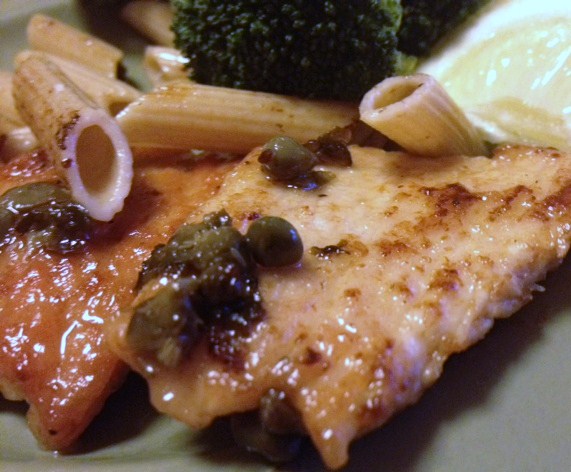
Turkey Piccata with Charred Aglio e Olio Penne

I bought all these healthy things at the supermarket with no big plans on what to do with them.  One of them I wasn't very excited about was turkey breast cutlets.  They look just like boneless chicken breasts.

But it's hot, and who wants to eat turkey?!?

I figured I'd make some simple plain dish that wasn't very exciting just so I can fell healthier and good about myself for eating a healthier meat. 

But guess what......?!


I made this turkey piccata that is TO DIE FOR!  I mean, it's good.  It's healthy.  
And the Boyfriend put it in the Top 5 Meals I Ever Made.


Just ever-so-lightly breaded, in a savory lemony caper sauce.


So easy and fast to make.  And you couldn't even tell it was turkey!


16 May, 2012

Caprese Quiche

I recently spent the weekend with The Boyfriend's family, and his mom served up 2 beautiful quiches, and it got me to thinking- considering how much I love quiche, why do I never make it??

And then I remembered that The Boyfriend must eat as soon as he arises, or the world will feel his wrath.  I do not exaggerate. He knows it, I know it, and anyone else that knows him.. knows it.  Consequently, there is never time to prepare a quiche. Really, who has an hour and a half to prepare breakfast?


Well I took matters into my own hands last week.  I made pie crust, and froze half so I can whip up another quiche at any given moment.  The remaining crust I used for Caprese Quiche, and had it for lunch, and breakfast for the next two days (The Boyfriend had some for breakfast too- by the miracle of the microwave).

The caprese flavors- tomato, basil, and mozzarella- work beautifully in a quiche.  Because the flavors are more delicate, I made a lighter, fluffier quiche to not overpower the simple ingredients.  The taste though, is anything BUT simple.


Make sure you use the freshest ingredients for this quiche.  Do not commit the Ultimate Sin of buying a bag of pre-shredded mozzarella! Just don't do it!  Those bags say low moisture for a reason- they will make for a dryer, less elastic quiche (think about having a pizza- some pizza when you pick up a slice the mozzarella cheese stretches for miles before you can get it to tear- that's REAL, more elastic cheese... some pizza you can pick it right up, no long strings of cheese- that cheese is a little dryer, and what you will get with pre-shredded cheese).

So for best results, buy fresh mozzarella near the deli, NOT mozzarella from the refrigerated section. You'll thank me later.

Caprese Quiche

For the Quiche:
3 eggs (room temp)
2 egg whites (separated while cold, egg whites at room temp)
1 tomato, sliced into 6 slices, placed on a paper towel to absorb excess moisture
1 cup fresh basil leaves, chopped
3 basil leaves (for garnish)
1/2 cup fresh mozzarella, grated
1/2 cup mozzarella, cut into thin, round slices. Reserve 3 of the most perfect round slices.
1 cup milk
salt and white pepper to taste (I added about 1/4 tsp salt and a 1/4 tsp white pepper)
1/4 cup flour
extra virgin olive oil

A 9 inch pie crust (Purchase one, or for best results, make the crust below)

  1. Preheat oven to 350 degrees.
  2. Sprinkle tomato slices with a little flour on each side. 
  3. In a saute pan, drizzle a little extra virgin olive oil in pan over med-high heat.
  4. Add the floured tomato slices, and cook until just turning golden, about 2 minutes each side.
  5. Transfer to dry paper towels to drain (same way you drain bacon on paper towels. 
  6. Use a whisk (or fork) to beat the 3 whole eggs together.  Add the milk, chopped basil leaves, salt and white pepper.  Add the egg whites and SHREDDED mozzarella cheese.  Whisk to combine.
  7. Add 3 tomatoes to the pie crust so they are not overlapping. Add the SLICED  mozzarella on top of the tomato (making sure you reserve 3 of your prettiest slices)
  8. Slowly pour the egg mixture over the tomato and mozzarella.  
  9. Place the remaining 3 tomatoes gently on top of the egg mixture. Top each tomato with a basil leaf, and top the basil leaf with the 3 reserved slices of mozzarella.
  10. Bake in preheated oven 45-55 minutes, or until cheese is melted and quiche is golden on top.

For the Crust:
Recipe from The Joy of Pastry by David Munn

Makes two 9-inch pie crusts

2 cups all purpose flour
1 1/2 tbsp granulated sugar
1/2 tsp salt
10 tbsp cold butter
1 large egg
2 tbsp ice water
  1. If you have a food processor, add the flour, sugar, and salt to the processor.  Cut the butter into small cubes, and add them to the processor gradually, pulsing to combine.  Continue pulsing until butter is distributed and you have a very crumbly dough.
  2. If you do not have a food processor, mix together the flour, sugar, and salt in a large bowl. Cut the butter into small cubes, and cut it into the dough.  When cutting into the dough, I use a sharp knife, and literally keep cutting the dough on the sides of the bowl.  The butter gets broken up into smaller pieces, making a crumbly dough. 
  3. Remove dough from food processor if using, and add to a large bowl. Now the dough is in a large bowl for everybody.  
  4. Using your hands, grab handfuls of dough and squeeze together slightly (don't squeeze super hard!).  You must do this fast, because you don't want the warmth from your hands to melt the butter. Continue squeezing until butter chunks are about the size of raisins.
  5. In a separate bowl, mix together the water and egg, and add to the flour mixture.  Knead it through the flour mixture until the liquid is dispersed, but do NOT over-knead it. It will still be a very crumbly dough.  You'll be tempted to add more water.. don't.  A crumbly dough means a flaky pie crust.
  6. Form the dough into a ball.  You;ll have to squeeze it a bit to get the crumbs to form a ball.
  7. Wrap in plastic wrap and refrigerate 30 minutes.
When rolling out the dough:
  1. Remove dough from fridge. On a lightly floured surface, begin to gently roll out the dough.  Make sure you also flour your rolling pin, and dust some flour on top of the dough as well.
  2. If dough begins to crack, use your hands to lightly press it back together.  
  3. Keep checking to make sure the dough is not sticking to the surface.  If it is, peel it up with a spatula, and add more flour to the countertop. 
  4. Roll the dough out to about a 9 inch round circle.  
  5. Carefully lift it with a large spatula and place it in the 9 inch glass pie pan.
  6. Press down the sides so the crust is even with the baking dish. Place the whole dish in the fridge to let the dough relax for about 20 minutes. Preheat oven to 350 degrees.
  7. Remove crust from fridge and bake for 12 minutes.  Prebaking the crust without the quiche filling will keep the crust from getting soggy.
  8. Let cool for about a half hour before filling it with the quiche ingredients.